

Working Time: 6 - 8 hrs
Total Time: 1 - 2 days
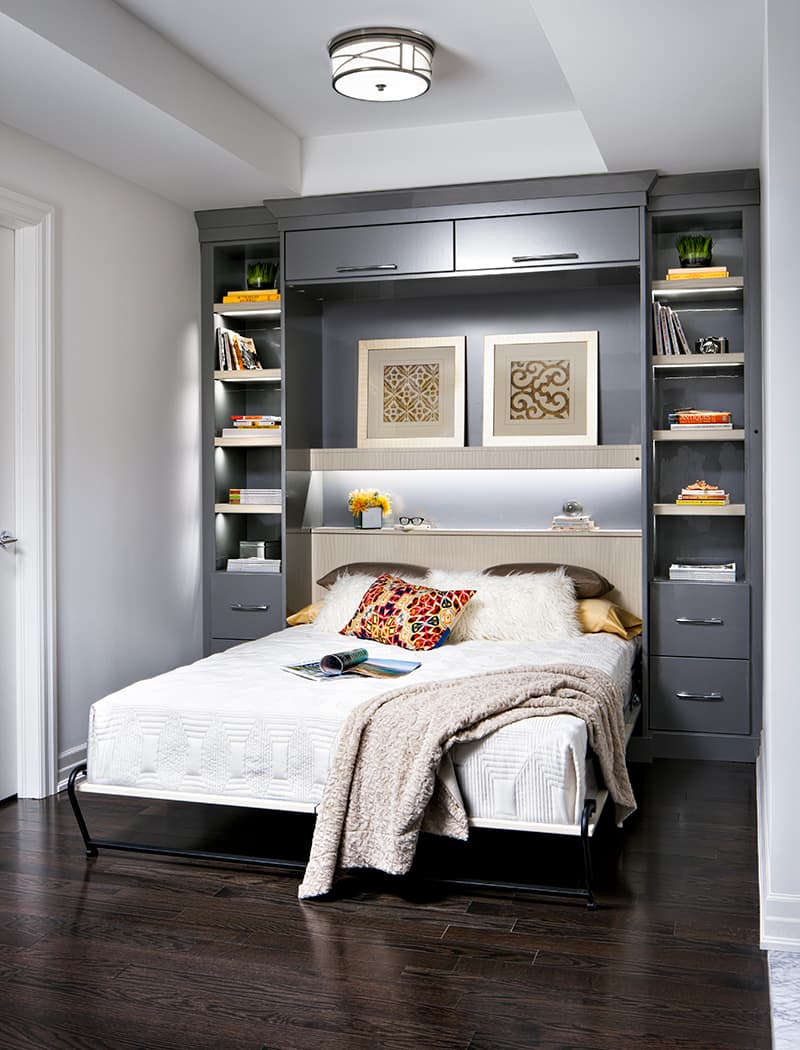
Yield: One Murphy bed with stylish cabinet doors
Skill Level: Advanced
Estimated Cost: $600 to $700
Building a DIY Murphy bed is a practical solution to reclaim floor space while providing a comfortable spot for overnight guests. Murphy beds, also known as wall beds, fold against the wall or into a cabinet. This project, including features like reading lights, electrical outlets, USB ports, and stylish cabinet doors, can be completed for less than $1,000.
Read on to discover how to craft your Murphy bed that not only looks great when not in use but is also budget-friendly.
How Much Does a DIY Murphy Bed Cost
Building a Murphy bed yourself is a cost-effective alternative to purchasing one, which can be significantly more expensive. The estimated cost for this DIY project is between $600 and $700, making it a more budget-friendly option compared to commercial alternatives.
For materials like plywood, solid wood, and a Murphy bed hardware kit, you can expect to spend a few hundred dollars. Opting for a hardware kit simplifies the process and adds a touch of convenience to your DIY Murphy bed.
The Cost of Wood for a Murphy Bed
The primary materials for a basic Murphy bed, including plywood and solid wood, will cost less than $400 on average. The choice of wood can influence the total cost, allowing flexibility in achieving the desired finish. This project utilizes nominal pine lumber and plywood for a sturdy yet economical result. For those seeking a more luxurious appearance, materials like oak can be used, stained rather than painted.
Murphy Bed Kits and Hardware
This DIY Murphy bed tutorial is adaptable to various Murphy bed hardware kits available on the market. Typically, these kits include legs, mattress straps, and springs or pistons for bed lifting and lowering. The tutorial incorporates integrated outlets with reading lights and USB ports for added functionality.
Before starting, ensure you have your Murphy bed hardware kit and follow the manufacturer's instructions for accurate installation.
Before You Begin
Before diving into the construction process, it's crucial to consider safety and follow specific guidelines. Securing the DIY Murphy bed wall cabinet to the wall is mandatory for both safety reasons and ensuring proper functionality. The wall provides essential support during the bed's opening and closing movements.
What You'll Need
Equipment / Tools
- Measuring tape
- Pencil
- Stud finder
- Level or laser level
- Miter saw
- Jigsaw
- Brad nailer with nails
- Drill
- Drill bits
- Iron
- Painting supplies
- Orbital sander with sandpaper
- Caulk gun
- Oscillating multitool (optional)
- Pry bar
- Ladder
Materials
- Murphy bed hardware kit
- Combination outlet extension and reading light
- 2 1x8 x 8' pine boards
- 3 2x2 x8' pine boards
- 1 2x4 x 8' pine board
- 2 2x4 x 10' pine boards
- 2 1x6 x 10' pine boards
- 4 1x4 x 10' pine boards
- 1 3/4" x 4' x 8' sheet sanded plywood
- 2 1/4" x 4' x 8' sheet sanded plywood
- 1 1/2" x 4' x 8' sheet sanded plywood
- 3/4" iron-on edge banding
- Wood glue
- 12 1/4" x 3-1/2" lag bolts
- 12 1/4" fender washers
- 2" wood screws
- 2 Cabinet pulls
- Painter's caulk
- Painting supplies
- Bare wood primer
- Interior paint
Instructions
How to Build a DIY Murphy Bed
-
Build Mattress Base Sides
- Cut two 2x2 boards to 75 inches and two 1x8 boards to 75 inches.
- Glue and screw a 2x2 along the bottom edge of a 1x8, pre-drilling and placing 2-inch screws every 6 inches.
- Repeat with the second 1x8 and 2x2.
-
Radius the Mattress Base Sides (optional)
- Use the provided template and a jigsaw to cut the radius from each top corner of the sides if your hardware kit requires this.
-
Attach Top and Bottom
- Place the assembled sides on your work surface with the 2x2s at the bottom.
- Cut two 1x6 boards to 56-1/2 inches and place them at each end of the sides.
- Glue the joints and screw through the 1x6s into the ends of the 1x8s and 2x2s to form a box.
-
Attach Middle Support
- Cut a 2x4 to 75 inches and place it in the middle of the box, centered at 28-1/4 inches.
- Screw through the 1x6 boards into the ends of the 2x4.
-
Attach Mattress Supports
- Cut eight 1x4 boards to 55 inches and place them equally spaced across the inside of the mattress box.
- Glue and screw them to the 2x2s and the 2x4.
-
Attach Mattress Straps
- Attach the mattress straps if they're included in your hardware kit according to the manufacturer's instructions.
-
Mount Leg Hardware and Legs
- Mount the leg hardware in your hardware kit on the bottom end of the base, according to the manufacturer's instructions.
- Once the hardware is in place, attach the legs.
-
Mount Pivot Mechanism
- Mount the hardware for the pivot mechanism (spring or piston) at the top end of the base using any templates or dimensions provided by the manufacturer for placement.
-
Determine Wall Cabinet's Dimensions
- Determine your wall cabinet's dimensions using the hardware kit as a guide.
- Consider the distance from the floor to the pivot mechanism and the required gap between the outside of the mattress box and the inside of the wall cabinet.
-
Cut Wood for Wall Cabinet
- Cut plywood into pieces for the sides and top of the wall cabinet.
- Attach iron-on edge banding to the plywood pieces.
-
Mark the Wall
- Mark the wall for your desired cabinet location.
- Mark each stud's location for easier installation.
-
Attach the Wall Supports
- Pre-drill and attach 2x4s to the wall for supporting the wall cabinet.
-
Mount Cabinet Sides
- Stand the cabinet sides up with the edge banding facing outward.
- Screw through the cabinets into the ends of each 2x4.
-
Attach Cabinet Top
- Place the top cabinet piece on top of the side pieces and screw through the top piece into the tops of the side piece using 2-inch wood screws.
-
Cut and Attach Vertical Nailers
- Cut 2x2 boards into pieces and attach them between the 2x4s against the cabinet sides.
-
Cut Back Pieces
- Cut 1/4-inch plywood into pieces for the back of the cabinet.
- Mount the recessed outlet and reading light if desired.
-
Mount Pivot Mechanism Hardware
- Mount the pivot mechanism hardware on the cabinet sides using the manufacturer's instructions.
-
Mount Bed Box in Wall Cabinet
- Use the manufacturer's instructions to attach the pivot mechanism and mount the bed box within the wall cabinet.
- Test the bed's functionality and make adjustments as needed.
-
Cut and Attach Outside Bed Box Cover
- Cut plywood into pieces and attach them to the front of the bed box.
-
Cut and Attach Faux Door Trim
- Rip plywood into strips and attach them around the perimeter of the bed box to create a faux door.
-
Attach Door Pulls
- Attach door pulls to complete the faux cabinet door appearance.
-
Attach Top and Bottom Trim to Cabinet
- Cut and attach top and bottom trim to cover the exposed interior of the cabinet when the bed is in the closed position.
-
Prime, Caulk, and Paint
- Prime all bare wood, caulk joints and seams, and fill nail and screw holes.
- Paint all surfaces with your desired paint color.
More DIY Murphy Bed Projects
There are various ways to approach building a DIY Murphy bed. Here are a few other projects that you might find interesting:
-
Modern Farmhouse Murphy Bed: Incorporates bookcases and a desk for a multifunctional Murphy bed office combo.
-
IKEA Murphy Bed Hack: Uses components from IKEA's PAX series to create a floor-mounted Murphy bed with a spring mechanism.
-
Basic DIY Murphy Bed Using Rockler Hardware Kit: A simple Murphy bed project using side-mount deluxe Murphy bed hardware from Rockler.
FAQ
-
What is the difference between a Murphy bed and a wall bed?
- In the past, Murphy beds used a spring mechanism, while wall beds used pistons. The terms have become synonymous over time.
-
Are there any alternatives to a Murphy Bed?
- Trundle beds, fold-out sofa beds, futons, and air mattresses are alternatives to Murphy beds.
-
Can I turn my bed into a Murphy Bed?
- While it's possible to convert some platform beds into Murphy beds, building one from scratch is a safer and more reliable option.
-
Is it hard to build a Murphy bed?
- Building a Murphy bed can be challenging due to precise measurements, but prefabricated Murphy bed kits can simplify the process.
-
Does a Murphy bed need to be attached to the wall?
- Not all Murphy beds need to be attached to the wall; floor-mounted options are also available.
-
Can you leave bedding on a Murphy bed?
- In most cases, you can leave sheets and possibly quilts or thin duvets on a Murphy bed when it's raised, but this can vary by bed model.
Post a comment